一、理论知识
- 极大似然估计:使得样本出现的概率达到最大的参数估计。
- 对于正态分布来说,样本均值就是它的参数$\mu$的极大似然估计。$1/n*\sum_{k=1}^n(x_k - \mu)(x_k-\mu)^T$是他的参数$\sigma^2$的极大似然估计
二、实验环境
- linux系统
- g++编译器,需6.3.0以上版本
- c++语言
-
也可以在windows系统下编译,需要在命令行使用vs2017, nmake命令编译,g++编译器6.3.0版本以上,但是在win下需要修改Makefile文件,将rm删除命令需改为del,同时可执行文件main修改为main.exe,
- 使用了英文版教材的实验数据
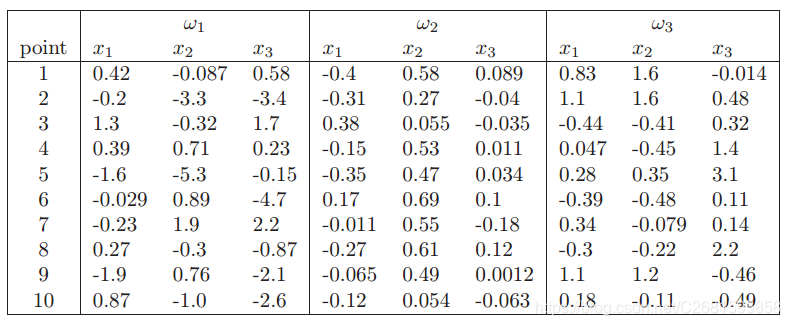
二、实验过程
- 在第一次实验的基础之上进行,所以已经有了Matrix类和Storage类,并且Bayes类中的很多函数可以稍加修改后直接使用,所以做起来较简单。下面对这次作业进行说明:
- 主函数
PETest.cpp
PE pe;
pe.setSampleFile("a.txt");
pe.setClassSize(3);
pe.setSampleSize(10);
pe.setVectorLen(1);
pe.estimate();
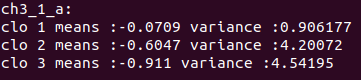
cout<<"ch3_1_a:\n";
for(int counter = 1; counter <= 3; counter++)
{
cout<<"clo "<<counter<<" means :"<<pe.getMean(counter).matrixToFloat()
<<" variance :"<<pe.getSigma(counter).matrixToFloat()<<endl;
}
①. 上面部分处理的是a小题的处理过程,新建对象,设置样本数据所在的文件pe.setSampleFile("a.txt");,设置有几组参数要估计pe.setClassSize(3);, 设置每组有几个样本 pe.setSampleSize(10);,设置每个样本维度pe.setVectorLen(1);上述这些参数设置在每次计算前必须设置,除非他和最近一次设置的是一样的
②. 进行估计pe.estimate();, 获取估计结果pe.getMean(counter).matrixToFloat();getMean()表示获取$\mu$的估计值,counter表示获取哪一组的估计值。matrixToFloat()将矩阵转化为浮点数,由于一维的样本,最终他的估计值也是一维的,但是它以矩阵的形式存在,所以我们可以将他转换成float形式。当然也可以不转换直接使用printMatrix()将它打印出来。
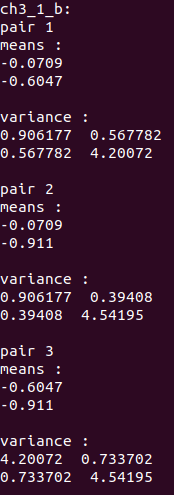
③. b小题和c小题处理办法是一样的,只是样本维度不同,获取到估计结果后不能转化为float,而要使用printMatrix()打印出来。
pe.setSampleFile("b.txt");
pe.setClassSize(3);
pe.setSampleSize(10);
pe.setVectorLen(2);
pe.estimate();
cout<<"\nch3_1_b:\n";
for(int counter = 1; counter <= 3; counter++)
{
cout<<"pair "<<counter<<"\nmeans :";
pe.getMean(counter).printMatrix();
cout<<"variance :";
pe.getSigma(counter).printMatrix();
}
pe.setSampleFile("c.txt");
pe.setClassSize(1);
pe.setSampleSize(10);
pe.setVectorLen(3);
pe.estimate();
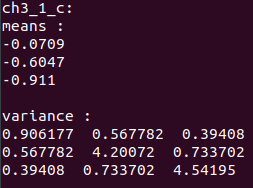
cout<<"\nch3_1_c:\n";
cout<<"means :";
pe.getMean(1).printMatrix();
cout<<"variance :";
pe.getSigma(1).printMatrix();
④. d小题
三、实验结果
a小题结果
b小题结果
c小题结果
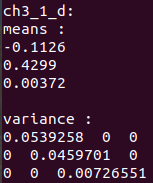
d小题结果
e小题
- 上面四题,只要样本数据相同,那么他们的参数$\mu$的估计值是一样的,因为不管是哪一个,他们计算的都是各个维度上的均值,只是他们的维度不一样,其他的都一样。
f小题
- 对于协方差的估计,前三题使用的是$1/n\sum_{k=1}^n(x_k - \mu)(x_k-\mu)^T$,而第四题,由于是对角阵,说明他的估计是$1/n\sum_{k=1}^n(x_k - \mu)^2$,就是说,每个维度分别求方差,就可以。这样求出来的结果刚好就是前面方法将非对角元素置为0的结果。
四、遇到的困难
- 是在上次的作业基础之上做的,所以比较简单。没遇到太大困难,最主要是上次作业是在vs2017上做的,这次转到了linux上,之前在linux上做的题目编译最多三个文件,而这次文件较多,并且对linux的Makefile编写不是很熟,导致在学习Makefile编写上面花了比较多的时间。学会编写Makefile后一个很短的总结。